TUTOR HOME |
HELP | BUY | CONTACT | ABOUT |
TUTOR HOME |
HELP | BUY | CONTACT | ABOUT |
| Assumptions and Tools |
| I use Windows NT4 and Windows 98 (Jared uses Windows 2000 Pro), JBuilder 4.0, and a variety of STEP and TILT boards, with an 8x1-Wire board too. At work we have NT Server, a 10/100 ethernet with DSL to the outside world. At home I have a Windows 98 notebook with a PCMCIA ethernet card, a small 10 MBit ethernet, and DSL with DHCP. OK, enough acronyms already! |
| Download the 1.02 files from Dallas | |
| Save the .gz tar file in a temporary folder - but don't install it right now. We have a big folder on our server called "incoming" with sub-folders such as "dallas\tini" where we store such things and keep an untouched copy of all such downloads. | |
| TINI 1.02 files | Get the update from Dallas by clicking on the ftp link to the left. Anonymous login is supported. Report bugs to Dallas at www.tini.ibutton.com |
| Break all references to older versions of TINI firmware. (Very important) |
| Make all prior versions unreachable by changing the current folder name (in my case this was "tini1.02" which held the 1.02p3 files) to something like "tini102p3_obsolete". This breaks all my current paths and classpaths so that I cannot accidentally still be referring to an old version of TINI firmware. This step will save you a lot of very hard-to-solve problems. Incorrect path and classpath references can be very hard to debug and lead to mysterious build- and run- time errors. So make such references impossible and you've dodged one bullet completely. |
| Install the new TINI firmware |
|
Use WinZIP or something similar to expand the TINI tar file into your system. I install mine on logical drive E: and tell WinZip to use folder information. This creates the folder E:\tini1.02 with sub-folders \bin, \doc, etc, just as they are stored in the tar file. Note: you are NOT installing the new 1.02 release over the top of the same root folder (tini1.02) as the prior 1.02p3 release. I'm updating from 1.02p3 to 1.02. Both of these release's tar files have a default folder of "tini1.02". Resist the urge to simply install the new 1.02 over the old 1.02p3. This is why we rename the old 1.02p3 folder first. This way you cannot have a mixture of new and old 1.02 releases in the same root folder. You don't want the old 1.02 files mixed in with the new ones! |
| Update JBuilder references to the new TINI firmware |
|
Jbuilder's JBuilder.config file, in e:\jbuilder4\bin must
have this line in the "addpath" area of the jdk.config
file. Note that this is JBuilder.config, this is a different
file than was changed in JBuilder4. Only the first portion of
the file is shown below in green with the additions in red. # Read
the shared JDK definition # add path
to TINI # Tune
this VM to provide enough headroom to work on large
|
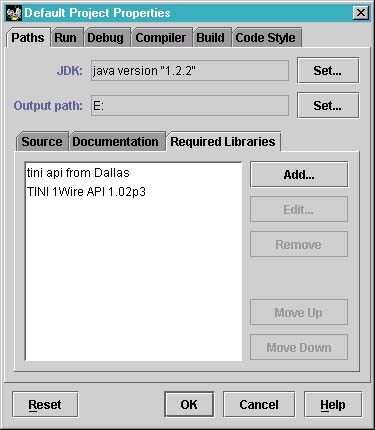
| Screen captures of JBuilder required library definitions | |
|
|
These are so similar to 1.02p3 that I did not repeat them. Please refer to the 1.02p3 screen captures to see what they look like. |
| Install the new TINI firmware on a TINI module using JavaKit |
|
I use a batch file JavaKit.bat to invoke JavaKit. Note the major batch file changes with JBuilder4 (if you have the old JBuidler 3.5 batch file). I also create macro files to configure TINI's IP address and options. Here's the macro file, ip45.mac for our "public" TINI demo system. Connect your PC to TINI's serial0 with a straight (not null modem) serial cable. Start JavaKit (I just click on the batch file) and you should be able to select a comm port and reset TINI if JavaKit is properly installed (if not, try here for JavaKit install help). Now at the TINI loader prompt (your TINI must be the 0515 loader, if not you need to use JavaKit's File->Update Loader command first), use the JavaKit Load file menu and load tini.tbin (from e:\tini1.02\bin). Then use the same procedure to load slush.tbin (from e:\tini1.02\bin), this is the TINI command shell which includes ftp and telnet services. Here's a screen shot of that. You will see TINI's D1 LED blink periodically through the loading process. Still at the loader prompt, clear the heap with a B18 and F0 (that's F'zero', not an uppercase 'O'). Now type E to execute slush. You should see the slush version
as 1.02 (not 1.02p3): Now's a good time to load and then run the macro file to set up TINI's IP configuration. |
| TiniTools |
| At this time, TiniTools will not convert a 1.02 .class to a .tini file. But the FTP Put and Telnet portions of TiniTools still work. (Not familiar with TiniTools?) |
| Make Shortcuts to the TINI and OneWire JavaDocs |
|
I like to have a folder with my various TINI tools, including
shortcuts to pertinent JavaDocs. The JavaDocs moved in 1.02p3,
thy are in the same place in 1.02 so nothing need be changed.
TINI JavaDocs are at For completeness, the Sun Java2 1.2.2 API JavaDocs are at
|
| Build, upload and run a TINI Java App - with these steps |
|
| Convert with BuildDependency |
|
Thanks to Kris Ardis at Dallas for a good method of passing a variable number of parameters to BuildDependency. Here's the batch file I use along with an enhanced dependency file. This lets me build with a command line such as: buildep Flasher4 10 12 ...which builds and converts Flasher4.class into Flasher4.tini, adding OneWire containers 10 and 12. Another option is to use TiniAnt (I haven't tried this yet), from Sean Kelly. |