TUTOR HOME |
HELP | BUY | CONTACT | ABOUT |
TUTOR HOME |
HELP | BUY | CONTACT | ABOUT |
TINI Firmware Update 1.02e
(released by Dallas 2002 Mar 28)
2002 Dec 02 - updated for JBuilder7
| What's New in 1.02e |
| See the Dallas readme.txt file in the root of your install for all the details. |
| Assumptions and Tools |
| I use Windows NT4, Windows 2000 Pro, Windows XP Pro, and Windows 98, JBuilder 5.0, 6.0, 7.0, and a variety of STEP and TILT boards, with an 8x1-Wire board too. Our office network uses NT Server and a 10/100 ethernet with DSL to the outside world. At home I have a Windows XP Pro notebook with 10/100 ethernet, and DSL with DHCP. |
| We don't use JDK1.4 yet, because... |
|
...some things in JDK1.4 are broken, Sun is aware of this and is working on a new release. Therefore we are avoiding it completely and sticking with JDK1.3. If you feel compelled to use JDK1.4, you can use it with TINI but you need to set a switch at compile time. From the TINI readme file: If you use javac from the J2SDK 1.4, make sure you specify the "-target 1.1" is the default in all of the earlier SDKs,
including J2SDK Example: javac -O -target 1.1 -bootclasspath ..\bin\tiniclasses.jar
|
| Download the 1.02e files from Dallas | |
| Save the .gz tar file in a temporary folder - but don't install it right now. We have a big folder on our server called "incoming" with sub-folders such as "dallas\tini" where we store such things and keep an untouched copy of all such downloads. | |
| TINI 1.02e files | Get the update from Dallas by clicking on the ftp link to the left. Anonymous login is supported. Report bugs to Dallas at www.tini.ibutton.com |
| Break all references to older versions of TINI firmware. (Very important) |
|
Make all prior versions unreachable by changing the current folder name (in my case this was "tini1.02d" which held the 1.02d files) to something like "tini1.02d.old". This breaks all my current paths and classpaths so that I cannot accidentally still be referring to an old version of TINI firmware. This step will save you a lot of very hard-to-solve problems. Incorrect path and classpath references can be very hard to debug and lead to mysterious build- and run- time errors. If you make such references impossible, you have dodged one bullet completely. Don't delete your previous TINI folder yet, as you will need to copy some files from it. I usually copy mine to a CDROM and hang onto the hard disk version for several weeks to be sure there's nothing else in it I need. |
| Install the new TINI firmware |
|
Use WinZIP or something similar to expand the TINI tar file into your system. I install mine on logical drive E: and tell WinZip to use folder information. This creates the folder E:\tini1.02e with sub-folders \bin, \doc, etc, just as they are stored in the tar file. Note: you are NOT installing the new 1.02e release over the top of the same root folder (tini1.02d) as the prior 1.02d release. I'm updating from 1.02d to 1.02e. Both of these release's tar files have a default folder of "tini1.02e". Resist the urge to simply install the new version over the old. This is why we rename the old folder first. This way you cannot have a mixture of new and old releases in the same root folder. You don't want the old files mixed in with the new ones! |
| Copy some files from 1.02d.old to the new 1.02e folder |
|
The loader 0515.hex is not included in the 1.02e release, so copy it into the tini1.02e/bin folder. Copy over any modified OWAPI dependencies files into the new /bin folder. In my case I have modified it and renamed it to tini_dep_systronix.txt, and I want to retain that file. If you have any JavaKit or FTP macros, batch files, etc, copy them over. I am not a great typist so typically have a macro for anything I do more than a few times. |
| Update JBuilder references to the new TINI firmware |
|
Jbuilder's JBuilder.config file, in e:\jbuilder5\bin must have this line in the "addpath" area of the jdk.config file. Note that this is JBuilder.config, this is a different file than was changed in JBuilder4. Later versions of JBuilder are similar. Only the first portion of the file is shown below in green with the additions in red. Note: this is not required in JBuilder7, and I think the only
reason we included this change in any version of JBuilder was for
us with MurkWorks TINI Tools. Since TINI Tools has not been maintained
for some time, we no longer use it. #
Read the shared JDK definition #
add path to TINI #
Tune this VM to provide enough headroom to work on large
|
| Update any Windows System parameters (very helpful, often overlooked tip!) | |
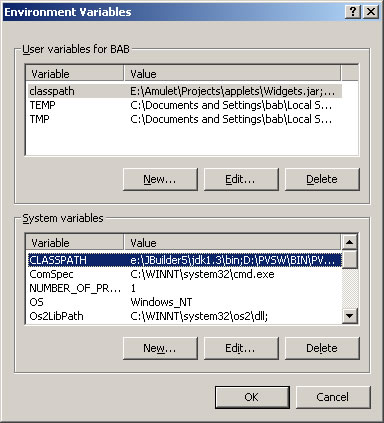
| Win 2000's (XP NT are similar) System properties (Control Panel->System->Advanced->Environment Variables) lets you set parameters such as a global classpath and system path. I use this, here's what it looks like: | |
 |
|
|
Note: change these paths to refer to your version of JBuilder such as d:\JBuilder7\jdk1.3.1\bin or whatever your actual path is. I also add e:\JBuilder5\jdk1.3\bin; to the beginning of the PATH environment variable, so that from a command prompt, the JDK1.3 java, javac, javadoc, etc are the *first* "java" executables found. This avoids the common mistake of invoking a browser or Windows system "java" executable from the command line. Here's what I add to the System variable classpath: |
|
| Other Windoze OS system variables are similar. |
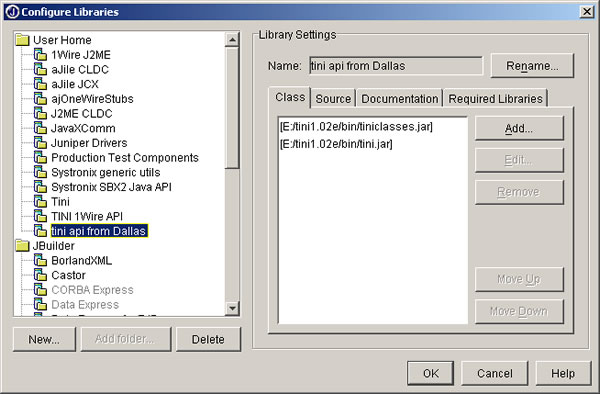
| Screen captures of JBuilder required library definitions | |
| You need a library for the TINI runtime support. tiniclasses.jar appears ahead of tini.jar in my setup but if there's a reason I don't recall what it is... | |
 |
|
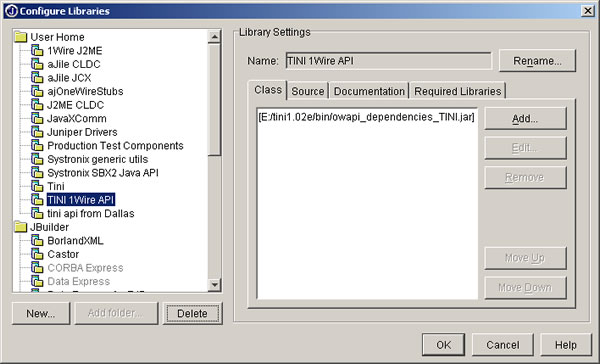
| If you are using 1Wire devices then you need to include the 1Wire TINI package in your libraries: | |
|
| Install the new TINI firmware on a TINI module using JavaKit |
|
Save any important files on TINI first, since updating TINI firmware will clear the heap and all TINI files will be lost. I use a batch file JavaKit.bat to invoke JavaKit. I also create macro files to configure TINI's IP address and options. Here's the macro file, ip45.mac for our "public" TINI demo system. Connect your PC to TINI's serial0 with a straight (not null modem) serial cable. Start JavaKit (I just click on the batch file) and you should be able to select a comm port and reset TINI if JavaKit is properly installed (if not, try here for JavaKit install help). Now at the TINI loader prompt (your TINI must be the 0515 loader, if not you need to use JavaKit's File->Update Loader command first), use the JavaKit Load file menu and load tini.tbin (from e:\tini1.02e\bin). Then use the same procedure to load slush.tbin (from e:\tini1.02e\bin), this is the TINI command shell which includes ftp and telnet services. Here's a screen shot of that. You will see TINI's D1 LED blink periodically through the loading process. Still at the loader prompt, clear the heap with a B18 and F0 (that's F'zero', not an uppercase 'O'). Now type E to execute slush. You should see the slush version as 1.02e: Now's a good time to load and then run the macro file to set up TINI's IP configuration, since all the ipconfig settings are cleared with the new update. Then I commit to flash memory with an 'ipconfig -C'. |
| TiniTools |
| TiniTools doesn't work with JB5 and later so we don't use it any more. |
| Make Shortcuts to the TINI and OneWire JavaDocs |
|
I like to have a folder with my various TINI tools, including shortcuts
to pertinent JavaDocs. The JavaDocs are in the same places in 1.02e
so the change is simple. TINI JavaDocs are at You may also wish to link to the Sun JDK1.3 javadocs at http://www.java.sun.com. |
| Build, upload and run a TINI Java App - with these steps |
|
| Convert with BuildDependency |
|
Thanks to Kris Ardis at Dallas for a good method of passing a variable number of parameters to BuildDependency. Here's the batch file I use along with an enhanced dependency file. This lets me build with a command line such as: buildep Flasher4 10 12 ...which builds and converts Flasher4.class into Flasher4.tini, adding OneWire containers 10 and 12. Another option is to use TiniAnt (I still haven't tried this yet), from Sean Kelly. |