| Blink Level One | |
| Goals of Blink Level One | This is a getting started tutorial for the JStamp, JStik and Saje real time Java modules. This tutorial will teach you how to create and load a simple program into an aJile native controller. You will be able to use the source code and instructions in this tutorial to build your own native Java programs. |
| Step One: Changing and compiling the example program | This step is needed to make sure that your Java development environment is set up correctly. Many vendors, including Sun, Systronix and the Eclipse project have published a great deal of information to help you to compile Java programs. This step will describe the general structure of the example program and provide links to this information. You will need to recompile the example program to get your module's heartbeat led to blink. The build files included in this tutorial will only print an error message to the Charade console to begin with. |
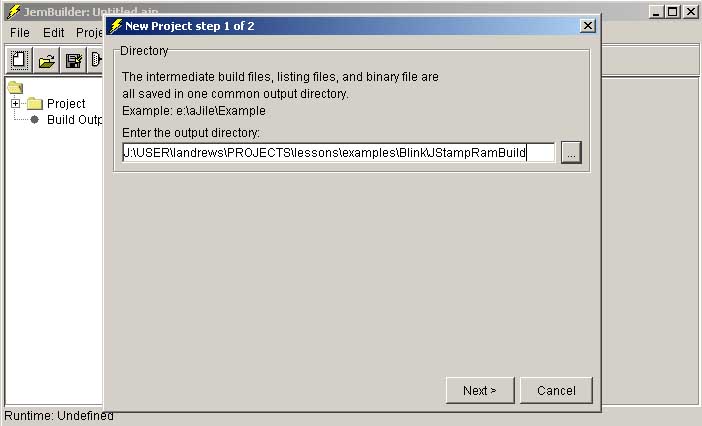
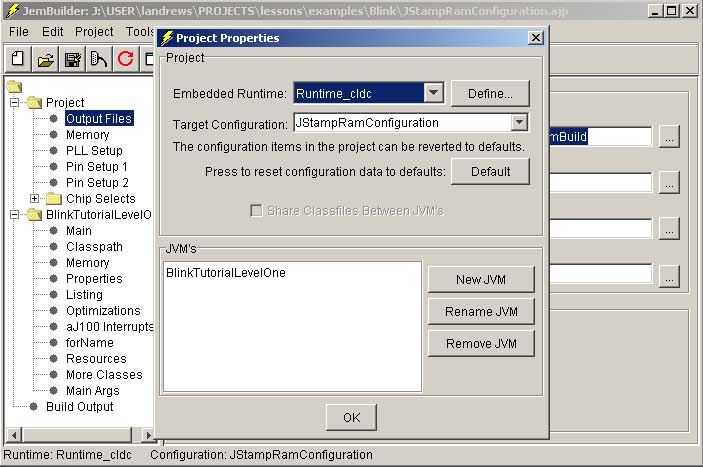
| Step Two: Creating your first JemBuilder aJile project file | This tutorial will explain how to set up your first project using the JemBuilder new project menu and will show you where all the settings you just added ended up in the user interface. |
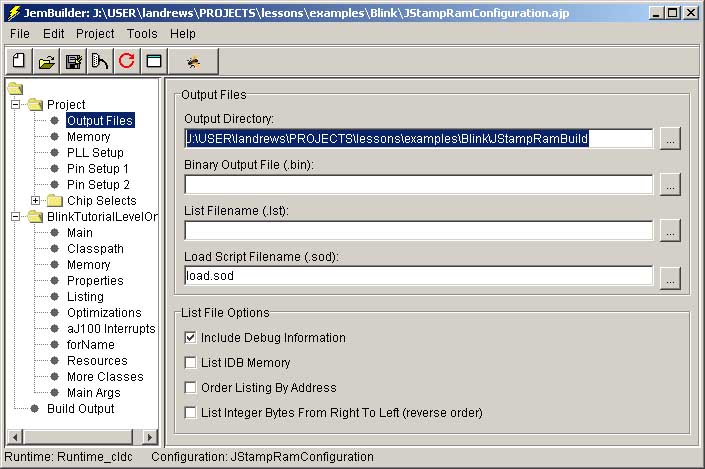
| Step Three: Building your first native Java executable | This step will explain how to save your new .ajp (aJile project file) file to disk for future use and how to build your first set of binaries. The files in your output directory will be briefly explained. |
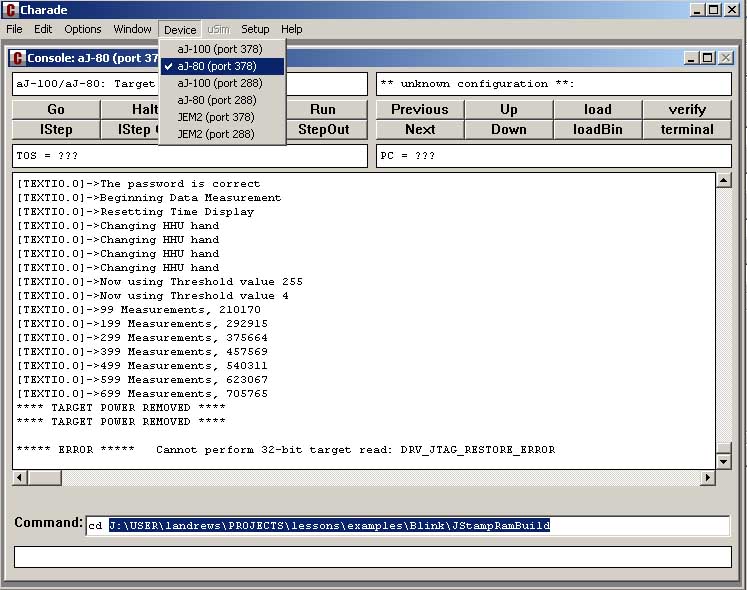
| Step Four: Loading and running your program using Charade | This step will show you how to load and run your program. The example program requires no input. Output will be on a light on your module and as debugging messages in the Charade console. |
| Tutorial Trouble Shooting | This section describes some common problems and solutions. |
| What to expect in Blink Level Two | You are likely to have many questions on how to do various things with the tools. Blink Level Two is a tools tutorial that will explain the settings in both JemBuilder and Charade and will include detailed configuration and debugging instructions to help you solve common software problems. Blink Level Two will give a description of all the settings in JemBuilder It will include a new example program that uses JemBuilder system properties to dynamically select which pin to blink to light your heartbeat led on Jstamp, JStik or Saje, without recompiling the example code. Blink Level Two will also show you how to include additional .jar class libraries in future projects and how to build programs to be loaded into flash for execution without a JTag connection. Blink Level Two will also explain how to use Charade as a debugger by explaining how to set up watch variables, how to check on the status of a currently executing program, and how to determine whether you should run your program from flash or ram. |
| Required Files | |
| aJile runtime and Systronix configurations | You will need JemBuilder and Charade to successfully run java programs on JStamp, JStik and Saje. |
| Example Code | This zip file contains example source code, a pre-built classes directory and pre-built embedded java executables. |
| Step One: Changing and compiling the example program |
This tutorial will be a step by step example of how to compile the example program using the Eclipse IDE. You will also be able to do this using your choice of development environment. We will try to explain each setting as we go along. If you have not installed to tools below, visit http://www.practicalembeddedjava.com/tools/javatools.html for more information.
First, unzip the example project into a convenient directory. Next, create a new project in Eclipse, select File->new, then Java->Java Project. Give your new project a logical name, uncheck the "Use default" checkbox and select your unzipped directory as the project contents to put it in as shown below.
|

Click next in the wizard. Eclipse should automatically locate the src
directory as the location of your source code. Feel free to change the
output directory to "classes", like we have used in our zip file, or
whatever you prefer for a place to put your compiled java code. Next,
click on the "libraries" tab to set up your classpath for the aJile runtime.
Remove the JDK 1.4 runtime from the jars and class folders on the build
path. Click on the "add External Jars" button and browse to the %AJILE_HOME%/Runtime_cldc
directory. Open the "classes.jar" file. Next, you will need to add the
%AJILE_HOME%/Runtime_cldc/Rts directory to include the needed files for
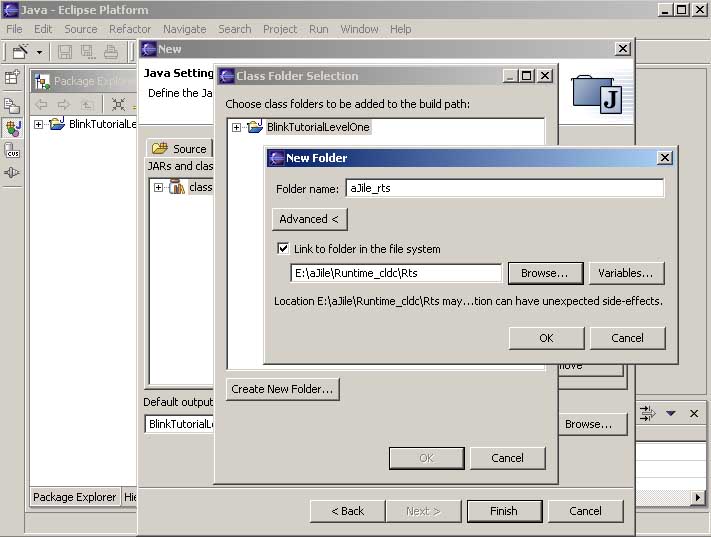
driving leds. To do this, you will need to add a classes folder to your
project and then link that folder to the appropriate directory. Click
"Add class folder" in the wizard and then click "Create new Folder",
then "Advanced". Type in an appropriate name in the Folder name field,
click the checkbox to "Link to folder in the file system" and
browse to the Rts directory. Click the OK buttons until you get back
to the new project wizard and then click "Finish" to create the BlinkTutorialLevelOne
project.
This process can be simplified by setting up a new JRE system library in Eclipse. That method of setting up your aJile classpath will be discussed in Blink Tutorial Level Two. The method shown here illustrates the basic ways you can include your existing .jar archives and class folders in your java build path. You can return to the classpath setup windows shown here by right clicking on your finished project root folder, selecting "properties" in the menu, and then selecting "Java build path".
Next, open your source file as shown below in java perspective (click the icon with a "J" on it in the far left toolbar as shown in the screen shot). You should not see any red X marks as shown in the screen shot below. All the files and resources in the project should appear in the left hand pane and the BlinkTutorialLevelOne.java source file should appear in the editor window to the right.
To successfully get your module's led to blink, you will have to change
the highlighted text from UNDECIDED_LED to the led identifier corresponding
to your hardware. For example, if you are using a JStik, change UNDECIDED_LED
to JSTIK_LED.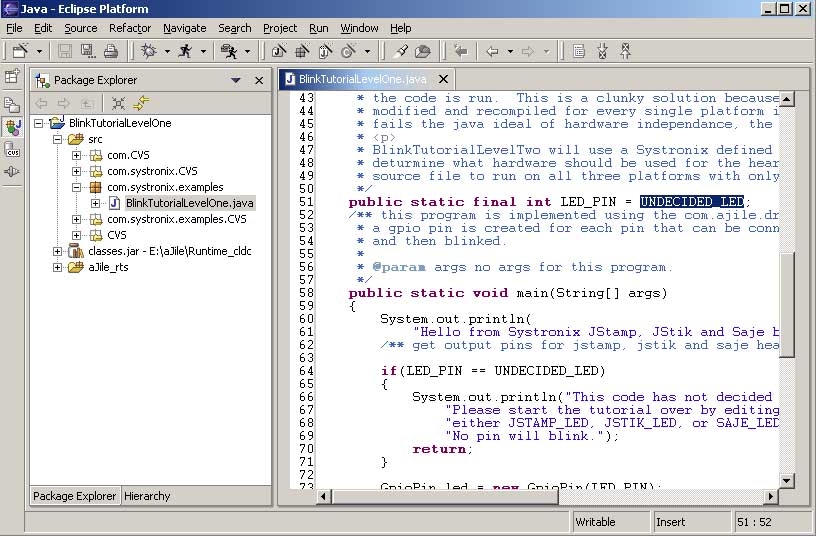
One of the great features of Eclipse is that all
you have to do to compile your source file is to save the file using
the disk icon in the top toolbar. Once the asterisk no longer appears next
to the filename in the title bar of the editor frame, you will know that
the class file in your classes or bin directory has been compiled to
the source code in the window.


| TroubleShooting | |
| Problem | Solution |
| Compiler error "Missing Type, java.lang.Object" | This is caused by an incorrect java classpath. Make sure to include %AJILE_HOME%\Runtime_cldc\classes.jar in your classpath. See Step One for Eclipse based instructions. |
| Compiler errors "Missing Type, com.ajile.*drivers and a bunch of different stuff* | This is caused by an incorrect java classpath. Make sure to include %AJILE_HOME%\Runtime_cldc\Rts in your classpath. See Step One for Eclipse based instructions. |
| Jembuilder error: Unable to find class "com/systronix/examples/BlinkTutorialLevelOne" | This is caused by an incorrect JemBuilder classpath This will occur if you attempt to use the unmodified .ajp files included with this tutorial. This can be fixed by changing the JemBuilder classpath as described in Step Three. |
| Jembuilder error: Unable to find class {anything other than com/systronix/examples/BlinkTutorialLevelOne} | This is caused by incorrectly typing in the main class name of the jvm. Enter "com/systronix/examples/BlinkTutorialLevelOne" into JVM->Main->Name of main method as described in Step Three. Do not include the quotes. |
| Jembuilder error: ** (Fatal): unable to open batch file: | This is caused by a JemBuilder output folder setting that corresponds to a folder Jembuilder cannot create. This will occur if you attempt to use the unmodified .ajp files included with this tutorial. This can be fixed by changing the JemBuilder output directory as described in Step Three. Make sure that you have Windows permissions to write to the disk and directory this folder points to. |
| Charade: ***** ERROR ***** Cannot open | This is caused by attempting to load something into Charade without first completing building in JemBuilder, or by loading from an incorrect directory. Rebuild your JemBuilder project, make sure it successfully builds. Next, change directories in Charade as described in Step Four and try loading again. |
| Charade: Program loads successfully, no output from program when attempting to run | Make sure that you have selected the correct device in the Charade device menu. Jstamp and JStamp+ should have aJ-80 selected, JStik and Saje should have aj-100 selected. |
| Charade: Target power removed status below console window title bar, multiple message boxes. | Make sure your device is properly powered and the JTag pod is connected to the proper JTag connector. Also check the other end of the cable to make sure the cable is connected to your PC. The green light of your JTag pod should be on and the red light should blink. When Charade starts printing out large amounts of information to the console or starts displaying multiple message boxes, you can usually get it to stop by pressing the esc key. |
| Charade: Processor not responding message box | Make sure your device is powered and the JTag pod is connected. After that, press "Reset" and go to the another trouble shooting entry if code does not begin to load. |