JStamp Tutorials -
Install Java Tools
|
| Please notice that the aJile tools must be installed
before you can create the J2ME and aJile library references
within JBuilder. If you already have JBuilder installed, that's
OK, just install the J2ME and aJile files before you try to create
the JBuilder library references. |
| Install the Sun
J2ME CLDC files & configure JemBuilder |
|
Extract j2me_cldc-1_0_2-fcs-winunix.zip
into a convenient place. I used e:\ (Be sure to check "use
folder names" if you use Winzip!) This sets up my J2ME files
in the root path e:\j2me_cldc\
The aJile J2ME runtime includes
all the Sun J2ME base classes, so you don't need to add the Sun
J2ME CLDC classes to your classpath. But you do want the Sun J2ME
CLDC files for reference and for the CLDC base class javadocs.
The aJile javadocs only include the aJile-specific classes.
The most recent version of J2ME locates the
class files in a different folder from earlier releases. Probably
just to keep us from getting too complacent and assuming everything
would work as we expected. The current root classpath for j2me_cldc
is E:\j2me_cldc\bin\common\api\classes
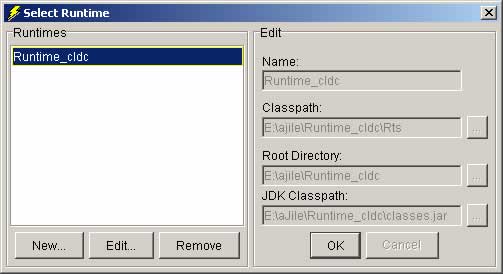
Start JemBuilder and make the toolbar selection
Project->Properties. In the Embedded Runtime box, select Runtime_cldc.
Make sure that the JDK classpath refers to the aJile runtime classes
JAR file. At this time (May 2002) aJile supports the 1.0 version
of J2ME CLDC, but the current version on the Sun website is 1.03.
Don't use the Sun runtime in the aJile classpath until aJile makes
the move to 1.03.
The JDK classpath tells JemBuilder
where to find all the J2ME base classes. Check that the aJile
paths are correct (they should be if you just installed the aJile
tools). Here's what mine are:
|
| Install the aJile tools - Charade
and JemBuilder |
|
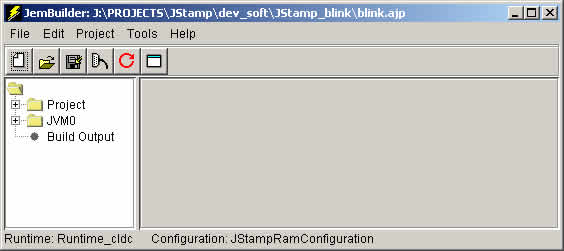
JemBuilder is the static linker and configuration
tool. It converts a standard .class file into a .bin file suitable
for execution on the aJile native Java controllers. JemBuilder
is written in Java.
Charade is the JTAG loader/debugger. It communicates
with your PC parallel port, through JTAG adapter hardware, to
the aJile controller. Charade is written in C and has some native
code for parallel port access. A Java version of Charade is being
considered.
Charade is the reason that the aJile tools
require a Win32 operating system.
|
|
Install the aJile tools provided on your JStamp
CDROM. In my case I installed to e:\ajile. See if you can start
JemBuilder:
We'll wait to start Charade until
we can actually give it something to do.
|
| Install JBuilder & set up
a shortcut to the command line invocation |
|
I installed to e:\JBuilderX where X is the
version digit such as JBuilder6.
Start JBuilder and enter your license keys.
Close JBuilder once you are convinced that it is starting up OK.
We'll come back and do more with it in a minute. For the moment
all we are going to use are the JDK files in the JBuilder "jdk1.3"
subfolder.
Note: the current release of the aJile tools
requires that you use a JDK1.3 -- aJile is not yet compatible
with JDK 1.4 and you will get JemBuilder errors if you try to
use 1.4.
Set up a shortcut to the command line
invocation of JBuilder. In my case this is: E:\JBuilder6\bin\JBuilder.exe,
instead of the Windows Start menu file E:\JBuilder6\binJBuilderW.exe
Starting JBuilder with JBuilder.exe leaves a command line window
open, and lets you see runtime and diagnostic messages. This can
be very helpful in diagnosing JBuilder plug-in failures, classpath
problems, or other unexpected behaviors.
|
| Configure JBuilder Project Properties |
|
JBuilder needs to know where to find the aJile
libraries. The aJile runtime includes implementation of J2ME
CLDC base classes so you don't need to also include the Sun J2ME
CLDC as a library, just include the aJile runtime. Create
new required libraries by clicking the JBuilder Project menu,
select properties, then the required libraries tab. In a new JB
install, there will not be any libraries in the list:
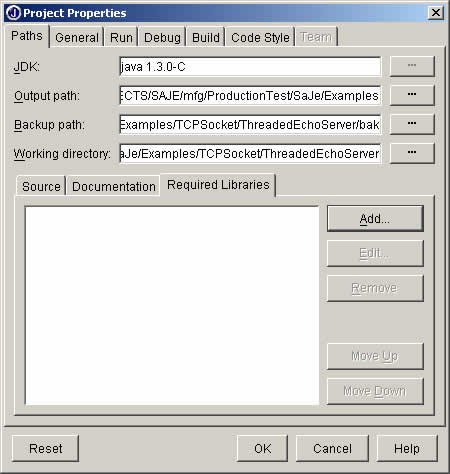
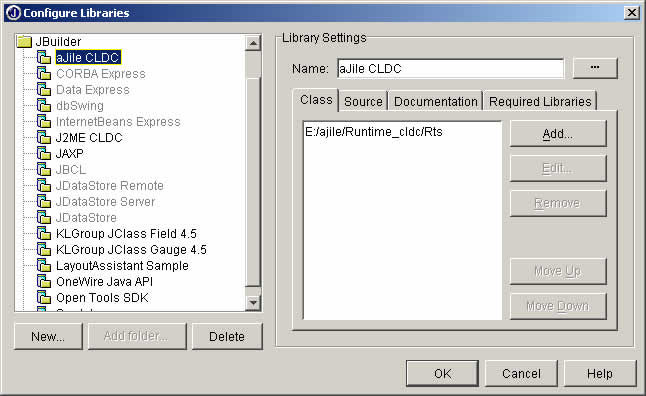
Click on Add, then New, and you
can enter the name and then browse to the parent folder of the
library classes. I created an aJile CLDC library:
| What is the aJile runtime_cldc/classes.jar
file? |
|
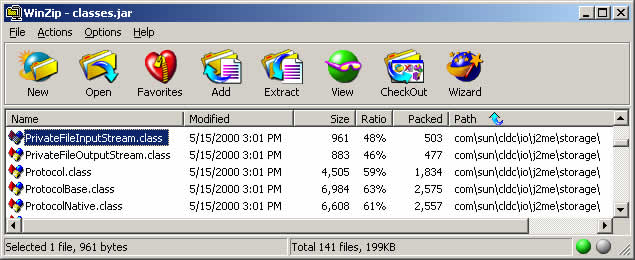
You may notice that aJile also provides a
"classes.jar" file in the runtime_cldc folder.
Don't use this, since it has been deprecated. It is only
there since it includes some storage classes which Sun removed
from the current J2ME CLDC release. J2ME CDC will add these
back in, plus a more J2SE-like file system.
Notice that I'm using WinZip to open the JAR
file - this is because a JAR file (JAR is an acronym for
Java ARchive) is in WinZip format, and WinZip is a perfectly
acceptable tool for working with JARs.
For the time being, classes.jar includes what
flash file system suppport there is. Here are the storage
classes:
If you must use these, you can create another
required library, referencing this classes.jar file, but
be sure it is the last entry in your required libraries
since it has class names which are identical to those in
the RTS folder, and you want the ones in the RTS folder
to be found first.
|
JB remembers these definitions
and they are easily included in subsequent projects. You can also
add these to the "default project" description (also
accessed from the toolbar Project menu).
|
| Update
any Windows System parameters (a very helpful, often overlooked
tip!) |
| NT4's System properties (Control
Panel->System->Environment) lets you set parameters such as
a global classpath and system path. |
| I add e:\JBuilder6\jdk1.3\bin; to
the beginning of the PATH environment variable, so that from a command
prompt, the JDK1.3 java, javac, javadoc, etc are the *first* "java"
executables found. This avoids the common mistake of invoking a
browser or Windows system "java" executable from the command
line. I also set my CLASSPATH here to include e:\JBuilder6\jdk1.3\lib\comm.jar; |
| Win2000 has a similar feature in
Settings->Control Panel->System->Advanced->Environment
Variables. |
| Check the version of java which
executes from a command prompt |
|
Open a command prompt and type "java
-version", and if your system path is set properly, you
should see version 1.3, like this (JB4 is shown, other versions
are similar):
E:\JBuilder4\commapi\samples\BlackBox>java
-version
java version "1.3.0"
Java(TM) 2 Runtime Environment, Standard Edition (build 1.3.0-C)
Java HotSpot(TM) Client VM (build 1.3.0-C, mixed mode)
If you get
some other Java version, then there is something else in your
environment which is referencing another "java" installed
on your PC. This could be part of an internet browser, an old
Java tool installation, or something else. Look at your system
PATH value and change it so that the new JBuilder jdk 1.3 bin
folder is in the path before any other java references.
|
| Install
the Sun Java COMM API |
|
Extract javacomm20-win32.zip into a convenient
place. I used e:\JBuilder6\commapi. (Be sure to check "use
folder names" if you use Winzip!) Now in that folder (e:\JBuilder6\commapi
for me) open the file PlatformSpecific.html, it has instructions
for installing the commapi files. Here's the short version,
edited for my case.
Copy e:\JBuilder6\commapi\win32com.dll
to e:\JBuilder6\jdk1.3\bin
Copy e:\JBuilder6\commapi\comm.jar
to e:\JBuilder6\jdk1.3\lib
(Apparently JBuilder
looks in the folder e:\JBuilder6\jdk1.3\jre\lib\ext -- if you
copy comm.jar there, then you don't need to add it to your classpath
-- JBuilder and the command line java tools will find it. However
some programs aren't entirely happy with this and will generate
errors, so add it to your classpath explicitly and leave it
in the jdk1.3\lib folder only)
Copy e:\JBuilder6\commapi\javax.comm.properties
to e:\JBuilder6\jdk1.3\lib directory. Failure to do this will
result in the inability to enumerate your PC serial ports -
instead of COM1, COM2 etc, you will see 'serial0' which are
just the name placeholders, not real serial ports. You can't
access 'serial0'.
Run BlackBox to test
the COMMAPI.
|
| Run BlackBox to test the COMMAPI |
|
Add the comm.jar file to your classpath,
in my case this can be done with a
set CLASSPATH=e:\JBuilder6\jdk1.3\lib\comm.jar;%CLASSPATH%
Then type "java BlackBox" at a
command prompt and BlackBox should claim your PC's serial port(s)
and start executing. If not, it is typically because the comm.jar
file is not in your classpath. If your serial ports can't be
enumerated, then javax.comm.properties is not in the correct
place.
|
| Troubleshooting |
|
Recently I was startled to see this error
message on my old reliable NT4 system:
E:\JBuilder6\commapi\samples\BLACKBOX>java
BlackBox
Exception in thread "main" java.lang.NoClassDefFoundError:
javax/comm/CommPort
E:\JBuilder6\commapi\samples\BLACKBOX>
What could I have done? Things used to work
fine. I hadn't changed anything (or so I thought). The problem
turned out to be that I had "cleaned up" some duplicate
files on my system. One of them was comm.jar, and so my classpath
no longer could find it. Simple but sometimes maddening. Easily
fixed.
If Blackbox won't run, it is typically because
the comm.jar file is not in your classpath. If your serial ports
can't be enumerated, then javax.comm.properties is not in the
correct place.
Get to a command prompt and type "set"
followed by an enter key. You should see a list of all the environment
variables. Verify that CLASSPATH and PATH are correct. If not,
set them here.
|
|

